Saturday, February 28, 2009

February Challenge Winner

It seems that there is no February winner, since there were no postings for our February challenges. I guess we are all too busy, so we will not be continuing posting monthly challenges. However, we want to improve our skills, so keep checking back for new tutorials. If there is something you would like to see, leave a comment so we know what you desire to learn.

And, you can always go back and do some of the older challenges, for fun!

Sunday, February 1, 2009

Congratulations to our January Winner!

I compiled the list of all of you who did our challenges for January and posted a link to your layouts. Here are the layouts that were done.

These three layouts were done for the challenges:
Mom by auntrachel

David by auntrachel

Rebekah by auntrachel

You can click on any of the layouts to go to the posting in the gallery and leave some love on these pretty layouts.

The random number generator (my husband) chose layout #3, so auntrachel is this months winner of Paula's latest released kit Little Valentine. Auntrachel, please send Paula an email so we can get your prize to you.

Try This! Tutorial Challenge - February 2009

For this months challenge, we are going to make 2 page layouts. There are two methods for making two page layouts listed on this tutorial blog. The first is Paula's Method and the second is Lorraine's Method I am sure there are lots of other methods too.

Your challenge is to use either Lorraine or Paula's method to create a 2 page layout. Then post your layout(s) in an online gallery of your choice and come back here and post a link(s) back to your layout in the comment section of this post. If you used at least one of Paula's products in your layout, then you will be entered at the end of the month for a chance to win Paula's latest kit.

Bonus: Paula hosts a challenge each month at Digital's called the Resolve to Scrap Daily Challenge. There is a daily option and a weekly option, and completing this challenge here, will help you on your way to completing the weekly challenge at digitals!

Photo Challenge - February 2009

February is the month of love, and it occurred to me that you might be getting tired of lovey layouts. So for this challenge, I want you to do a layout that includes a photo of something you do not like.

Other than that, you can do whatever you like with your layout. Need some ideas? How about a food you don't like, or a place you would not want to visit. Be creative, and don't be afraid to let us learn a bit about you through your layout!

When you are finished with your layout, post it in an online gallery of your choice. Then, come back here and post a link to your layout in the comment section of this post. If you used at least one of Paula's products (can be a freebie) in your layout, you will be entered at the end of the month for a chance to win Paula's newest kit.

Inspiration Challenge - February 2009

For this months Inspiration Challenge, I have chosen as our inspiration the song, A Groovy Kind of Love by Phil Collins. Here are the lyrics:

When I'm feeling blue, all I have to do
Is take a look at you, then I'm not so blue
When you're close to me, I can feel your heart beat
I can hear you breathing in my ear...

Wouldn't you agree, baby you and me,
we've got a groovy kind of love...?

Anytime you want to, you can turn me on to
Anything you want to, anytime at all.
When I kiss your lips, ooh I start to shiver
Can't control the quivering inside...

Wouldn't you agree, baby you and me,
we've got a groovy kind of love...?

When I'm feeling blue, all I have to do
Is take a look at you, then I'm not so blue
When I'm in your arms, nothing seems to matter
My whole world could shatter, I don't care...

Wouldn't you agree, baby you and me,
we've got a groovy kind of love...?


I chose this song because, even though I never thought much about this song, I found out several months after we started dating that my husband considered it to be our song. You'll have to wait to see my layout to find out why!

Your challenge: Use this song as inspiration for a layout. You can include the title of the song or the lyrics, but that isn't necessary. It just needs to be clear that the song was your inspiration for your layout. I look forward to seeing what you come up with!

When you complete the challenge, post your layout in an online gallery of your choice. Then, come back here and leave a link to your layout in the comment section of this post. If you used at least one of Paula's products (can be a freebie) in your layout, you will be entered at the end of the month for a chance to win Paula's latest kit!

Little Steps to a Great Layout Challenge - February 2009

For this challenge, you will be given 5 steps to create a layout. To complete the challenge, you must do all 5 steps. Here they are!

1. Use photos of someone/something you love.
2. Use at least 2 alphas.
3. Use at least 3 papers.
4. Place your date in a creative spot.
5. Add at least 3 lines of journaling.

When you finish your layout, upload it to an online gallery of your choice. Then add a comment to this post with a link back to your layout. If you used at least one of Paula's items (can be a freebie) you will be entered at the end of the month for a chance to win Paula's latest kit.

Quick Start Challenge - February 2009

For this challenge, I have created a quick page, using Paula's latest Valentine's kits, Little Valentine and My Valentine.

Here's the page:
Quick Start Challenge Quick Page
Click on image or here to get the quick page.

Your challenge is to use this quick page to create a layout. Post it in an online gallery (make sure to give credit to Paula for her kits) and then come back here and leave a comment on this post with a link to your layout. At the end of the month, you will be entered in a drawing to win Paula's latest kit.

Twist This Template Challenge - February 2009

For this months challenge, I created a template to make a Valentine's card for your sweetheart. It is a hybrid project - that means you get to print it and have something in your hands - not just stuck forever on your computer, when you are all done.

Twist This Heart Card Template
click on image or here to download template.

This card is simple to assemble, create and print your layout (if you resize everything by 60% you can easily print on a 8 1/2 by 11 sheet of paper - you might want to do that before you start!) Then fold the inside in half and glue the front and back to the appropriate sides. You can add lace, glitter or other embellishments to make the card truly your own!

When you are finished, take a photo of your card and post it in an online gallery. Come back her and add a comment with a link to your post to this post. If you used at least one of Paula's products (can be a freebie) in your project, you will be entered at the end of the month in a drawing to get Paula's latest kit for free. I can't wait to see what you come up with!

Monday, January 26, 2009

January Brag Book Challenge

Welcome to the First Monthly Brag Book Challenge! Your Challenge will be to use them and Post them to a Gallery and Link back Here so we know you have done them. You must use ONE of the Two brag book pages I give you!

Here are your First Two!! Please use them and post your link By 2-26-09.

Photobucket

You can get them here!

Be sure to Credit Paula when posting your layouts to any gallery! These were made, with permission, using Paula's Icy Winter Blues Kit!

Wednesday, January 14, 2009

Shadows

Tutorial by Lorraine (with some wording borrowed from a tutorial by Paula)

One of the first lessons that any digi-scrapper should learn is proper shadowing. After layering, it is probably the most valuable lesson you can learn! For these tips, I've created 4x6 sample layouts; this is because when you view a 12x12 page, you often look at it "smaller" than it truly is. When you work with a 4x6 layout, you can view it on screen at closer to print size; this allows you to get a better since of how it will look printed at true size. However, the same rules and tips apply to ANY size layout - they are just easier to see this way.

Example One: No shadows at all
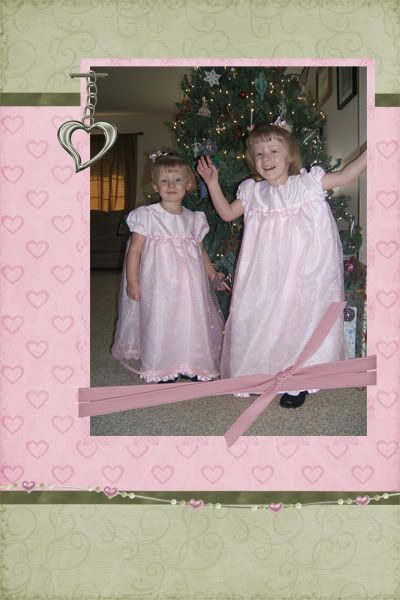
No Shadows Example
When I first started scrapping - and I'm sure when many others first started, I knew NOTHING about adding shadows in a digital image or layout. But, without shadows, your layout will look so flat and bland. There is no depth or dimension to give it a realistic look!

Example two: default shadows all around
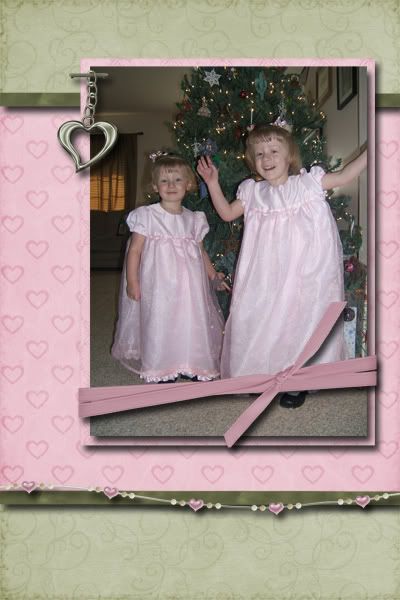
Defauly shadows on everything
So, every scrapper goes through a stage where they have learned how to add shadows, but not how to adjust them. Every shadow is the same - and they all appear too deep! This layout is created with PSE 5,0 - and the default shadow was a size of 21 pixels, distance of 21 pixeks and opacity of 75%. There is also a default color for the shadow. As you can see, it just doesn't look "real". (Note: Different software programs, and versions will have different items you can adjust to affect the look of the shadow.)

Here is a screen shot from PSE 5.0 to show you how to adjust the shadow in this program. All versions of PhotoShop will have a similar appearance.
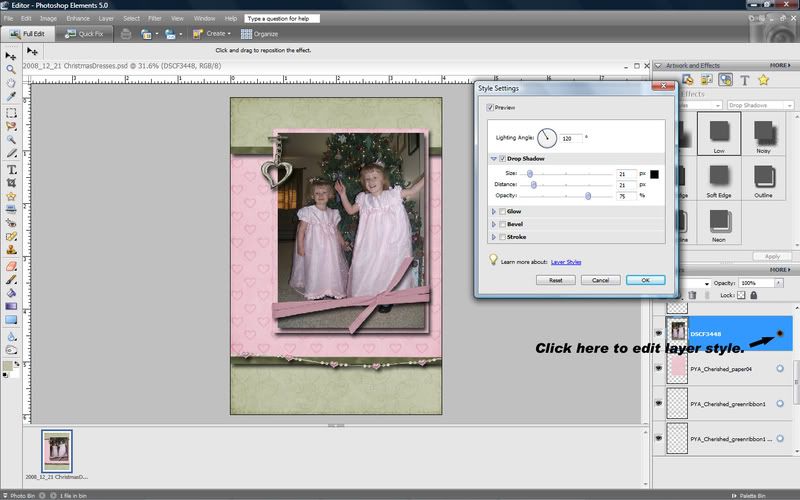
Adjusting shadow in PhotoShop
Once a layer style is applied (a shadow is a layer style), you can adjust the default settings by clicking on the little sun shaped image at the right side of the layer in the layers palette. This will bring up a window where you can adjust the settings, and they will change in your image as you adjust so you can tell when you have what you want.

Example three: shadows adjusted
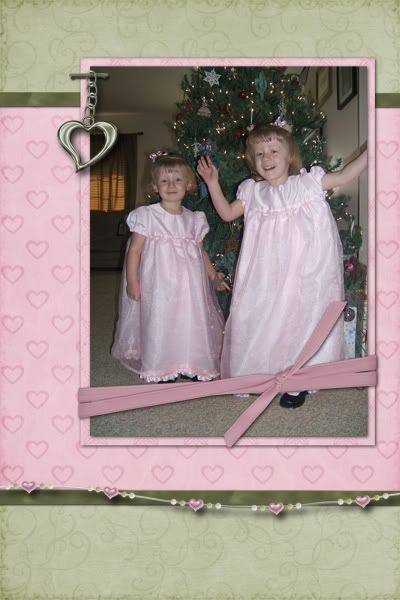
Shadows adjusted.
Get out a sheet of printer paper and lay a few items on it. If you place a picture on it, you will see a very faint shadow. If you place a button, it casts a larger shadow. A sticker or stitching will have almost no shadow at all! But beads will cast a large shadow by comparison. This is how a "real layout" would look, and it's how we want our digital layouts ot appear.

So, think about the thickness of the element and how you want it to appear. For papers and photos, I use a shadow with a small distance and a bit bigger size - for the chain, the shadow would be bigger. The charms and beads are the thickest items, so they should have the largest shadow. I placed a larger shadow on the ribbon wrap than on the green ribbon because is would come up higher off the page and thus cast a larger shadow. The key is, play with it until it looks real - look at it as close to print size as you can, so you can get a good idea of how it will look printed.

Don't be afraid to play. The beauty of digital scrapbooking is that if you don't like it you can always change it!

Other tips:

90% or more of designers create their elements to appear as if the light is shining from the top left side. To get a truly realistic look, your light source should be the same!

If you are placing a ribbon or other long element at an angle from top left to bottom right, the above light source wouldn't leave much if any shadow. But, this looks silly on the printed page. The solution, set this shadow so that it doesn't use the "global" setting - pick a slightly different angle, just enough to you can see a slight shadow.

For really small items, such as stitching, it is sometimes nice to have a shadow that just barely shows all the way around. In PSE, I am able to do this by creating the shadow and then changing the setting to zero. That's right, at 0, the shadow doesn't go away, it just shows tiny all the way around. This may not be on all versions, so just play with your settings until you like the effect.

Can't get it to look right with the standard settings? Try creating a new layer and the paint brush to DRAW your own shadow. Just change the opacity until you like the look - you can even move it more or less under your element until you get the right size! If it doesn't look right, delete or hide the layer - you haven't hurt a thing.


The layout I created for this tutorial used Paula's Cherished Memories page kit.

Two Page Layouts - Side by Side Method

Tutorial by Lorraine

It's always good to have more than one method for doing things, so I thought I would share how I do two page layouts (especially when I want a title or photo to spread across two pages.)

For the purpose of this tutorial, I will assume the layouts with each be 12x12 inches. I will also be using PhotoShop/PhotoShop Elements specific commands, though the general idea should work for whatever program you use.

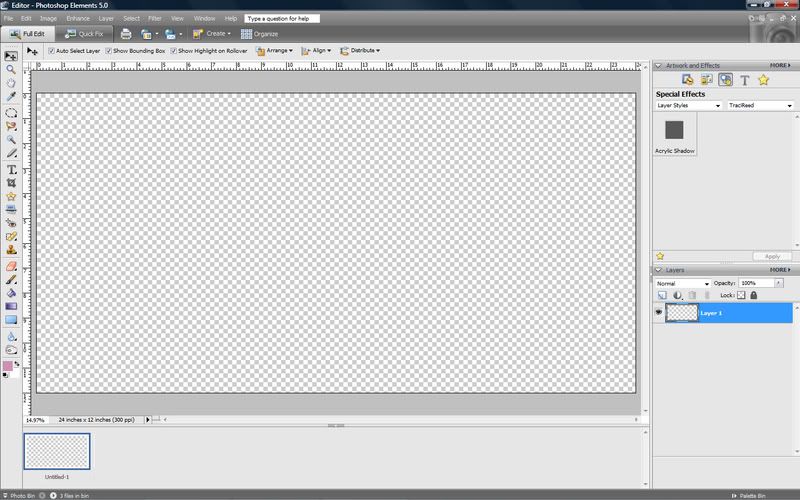
1. Open a new document that is the size of two layouts side by side (for a 12x12 inch layout, the document would be 12x24 inches.)
Open New Document

2. Turn on the grid.
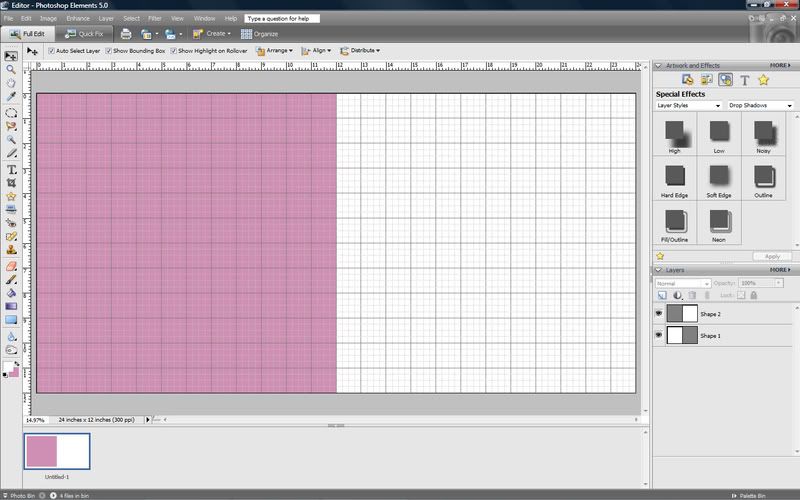
3. Use the custom shape tool to create 2 12x12 inch squares and place them on either side of the page (where your two 12x12 inch layouts will be). Turn off the grid if you desire. (Note: for this image I used two different color squares so that you can see them, but in practice I just use the same color - it's less work. The color doesn't matter because you don't see the squares in the final layout.)
Create a square on each side of your layout.

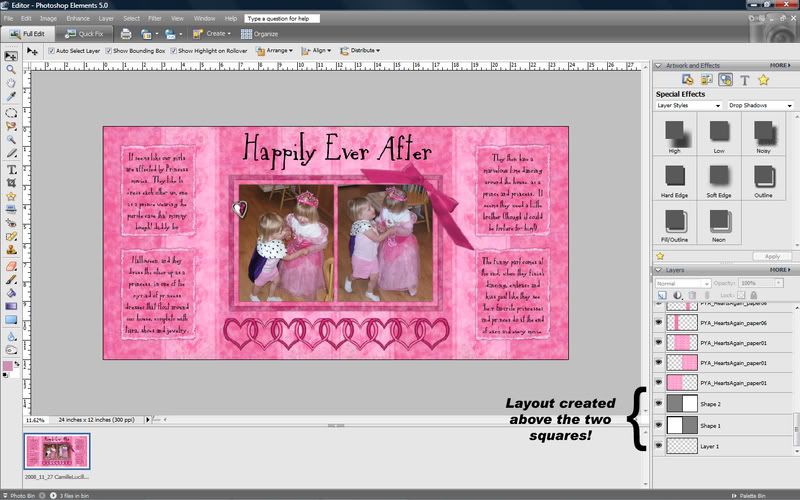
4. Scrap your layout above the two squares as you would normally do. You don't have to worry about items crossing over the middle line!
Create your layout.

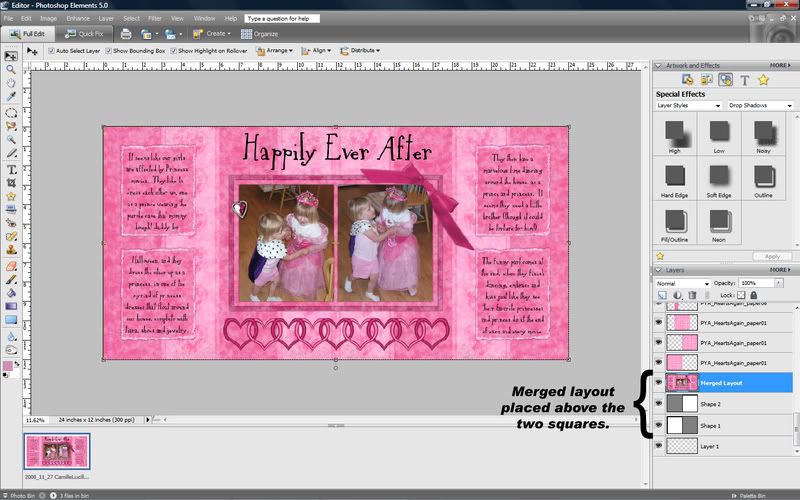
5. Highlight all of the layers of your layout. Copy (drag to the new layer icon, which looks like a square, with the corner turned up - located at top or bottom of layers palette) the layers, and then merge the copied layers. (In some versions of PS you can "layer via copy" which will do this for you in one step.) Drag this merged layer down in the layers palette so it is directly above the square layers.
Copy and merge together your layout layers.

6. Open a new 12x12 inch layout.
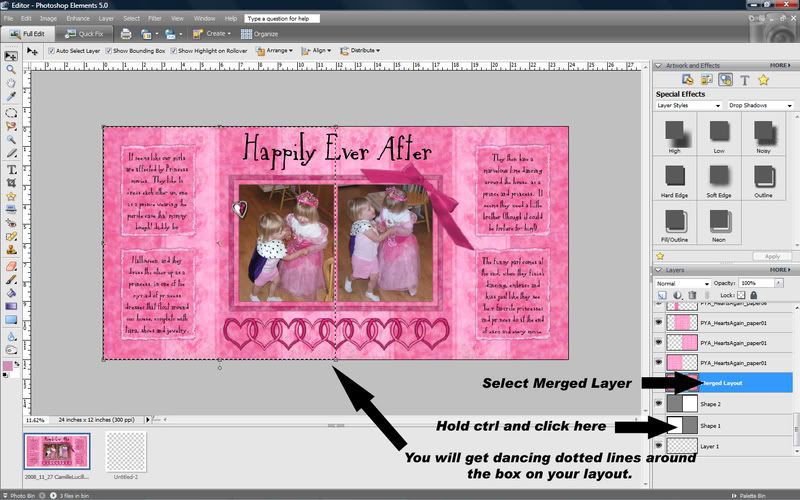
7. Select the merged layer in the layers palette (it will be highlighted blue.) Hold down ctrl and click on the square at the left side of one of the square layers in the layers palette. This will cause the shape of that layer to be selected. (This is a good trick any time you wish to select the shape of a specific layer.)
Select Shape of one of your square layers.

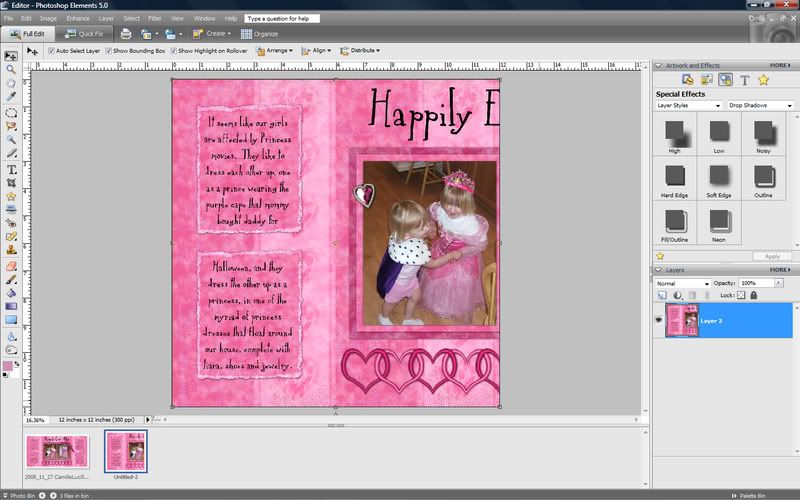
8. Copy (ctrl-c, older versions of PSE may have to do edit-copy) (this copies whatever is inside the selected shape on whatever layer is selected - in this case your merged layer). Paste into the new document you just opened. You should end up with one half of your layout.
Copy and paste into new document.

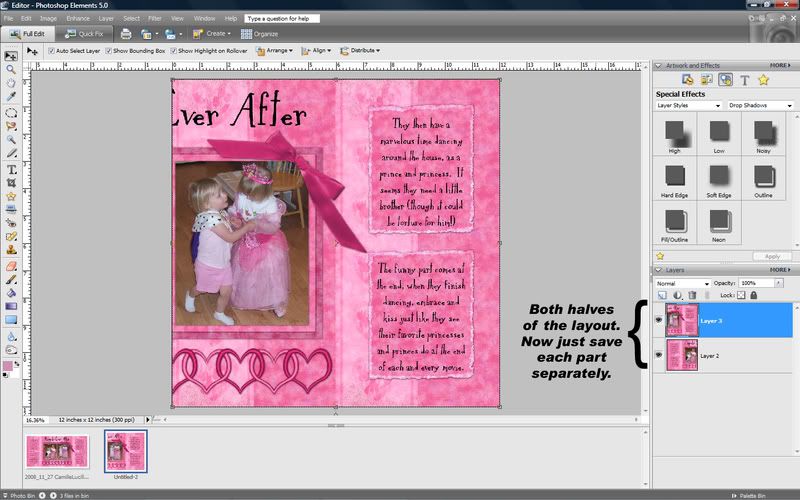
9. Repeat steps 7 and 8 for the other side of the layout. You will now have the two halves of the layout layered on top of each other in the new document.
Copy and paste the other side into the new document.

10. You can now save the individual 12x12 layouts for printing!

The layout I created for this tutorial was created using Paula's Hearts For My Love, Again page kit.

Thursday, January 1, 2009

Welcome to Dreamer Paula's Tutorial Blog

Welome to Paula's Tutorial Blog. This blog was created as a place for Paula and her creative team to share tutorials and fun challenges to inspire you.

If you have a question or there is a tutorial you would like to see, please leave a comment on this post, and we will do our best to add those tutorials!

We are glad you are here and hope that you will return often!

Try This! Tutorial Challenge - January 2009

Thank-you for visiting this blog and participating in the challenges. Challenges are a great way to inspire yourself and also to learn more! Each challenge you do for "this month" will earn you one chance in the drawing to win one of my newest kits. In order to be eligible to win, you need to fulfill the requirements listed in the challenge, make sure that you use at least one product by DreamerPaula (this can even be a freebie), and you also need to post a link in the comment section of this blog post with a link to your layout!

This challenge is for January 2009 and is hosted/written by Lorraine.

The challenge this month is to read Paula's How to Chalk Elements Tutorial and then complete a layout that includes at least one chalked element.

You may use the Chipboard Freebie for this challenge, but don't hold yourself back. You can chalk on anything: Chipboard, Frames, Cardboard you name it. So, be creative and have fun!

If you complete the challenge, using at least one of Paula's products, post it in a gallery of your choice, and post the link in the comment section of this thread, you will be entered in a drawing to win Paula's latest kit.

Quick Start - January 2009

Thank-you for visiting this blog and participating in the challenges. Challenges are a great way to inspire yourself and also to learn more! Each challenge you do for "this month" will earn you one chance in the drawing to win one of my newest kits. In order to be eligible to win, you need to fulfill the requirements listed in the challenge, make sure that you use at least one product by DreamerPaula (this can even be a freebie), and you also need to post a link in the comment section of this blog post with a link to your layout!

This challenge is for January 2009 and is hosted/written by Paula.

Each month, you will receive a sampler kit that will help you scrap quicker. Each month, the sampler will be different (and made to match a new kit). You might get a full blown Quick Page, a Page Cluster, a Template with mini kit, or something else - whatever it is, it will help you make quick and beautiful layouts!

This month, you get a pre-pieced background with two additional elements. You are required to use the background (that's the quick part) but everything else is optional. This matches "Cherished Memories" - my new kit to be in the stores on Jan. 1 or 2.


Click HERE to get the download!


Sample layout by Beverly - using "Cherished Memories":
Layout by Beverly

Inspiration Challenge - January 2009

Thank-you for visiting this blog and participating in the challenges. Challenges are a great way to inspire yourself and also to learn more! Each challenge you do for "this month" will earn you one chance in the drawing to win one of my newest kits. In order to be eligible to win, you need to fulfill the requirements listed in the challenge, make sure that you use at least one product by DreamerPaula (this can even be a freebie), and you also need to post a link in the comment section of this blog post with a link to your layout!

This challenge is for January 2009 and is hosted/written by Dawn.


The faces of our lives! We see them everyday. Some have passed on before us, but still live in our memories and hearts forever! Your challenge this month is to use this ad for inspiration to focus in on your loved ones. You can chose a close up of their faces like you see here, or a close up of their hands. Be creative! Make sure you journal about each and every loved one you scrap! Your requirement this month is to create a LO inspired by this image - post it somewhere and give us a link in the comments of this entry. Don't forget - you have to use at least one of Dreamer Paula's products to be eligible to win the drawing for the free kit!

Sample layout by Paula - using Family Traditions:
Layout by Paula

Twist This Template Challenge - January 2009

Thank-you for visiting this blog and participating in the challenges. Challenges are a great way to inspire yourself and also to learn more! Each challenge you do for "this month" will earn you one chance in the drawing to win one of my newest kits. In order to be eligible to win, you need to fulfill the requirements listed in the challenge, make sure that you use at least one product by DreamerPaula (this can even be a freebie), and you also need to post a link in the comment section of this blog post with a link to your layout!

This challenge is for January 2009 and is hosted/written by Lorraine.

Templates are a great way to make a layout quickly and try a style you haven't used before. This months template is a pretty simple one photo template. You can get it here!
January Template Challenge

The important thing to remember when using templates is to make it your own. Whether you do this by simply choosing your paper and elements, or are more creative - it should be fun.

Here are a few ideas for making this template your own:
- Move items around
- Add or remove elements
- Rotate the template
- Add another photo

To complete this challenge, simply create a layout using the template and post it in an online gallery of your choice. Place the link in the comment section for this post. Make sure to give Lorraine credit for the template per the terms of use included with the freebie.

If you complete the challenge, using at least one of Paula's products, post it in a gallery of your choice, and post the link in the comment section of this thread, you will be entered in a drawing to win Paula's latest kit at the end of the month.

Photo Challenge - January 2009

Thank-you for visiting this blog and participating in the challenges. Challenges are a great way to inspire yourself and also to learn more! Each challenge you do for "this month" will earn you one chance in the drawing to win one of my newest kits. In order to be eligible to win, you need to fulfill the requirements listed in the challenge, make sure that you use at least one product by DreamerPaula (this can even be a freebie), and you also need to post a link in the comment section of this blog post with a link to your layout!

This challenge is for January 2009 and is hosted/written by Dawn.

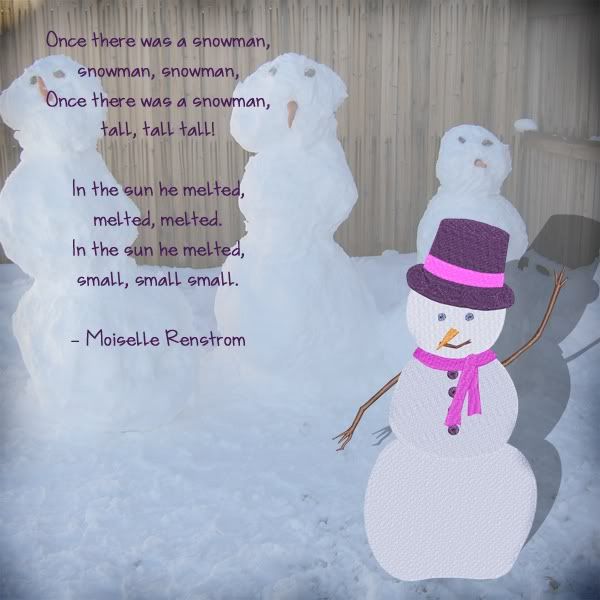
Photograph a snowman or snow-woman - your choice!

For those of you in the Southern states or places that do not get any snow, be creative! You could build a "snow"man out of sand at the beach. Or make one out of 3 scoops of ice cream on a cone or in a bowl. You have exactly One month to complete your layout. Please follow the instructions given - use at least one product/freebie from Paula - post to gallery of your choice - share a link to the LO in the response of this challenge post. All of the participants will be eligible for a drawing to win Paula's newest product! So, get those camera's ready and start snapping away!

Here are a few examples from Lorraine:
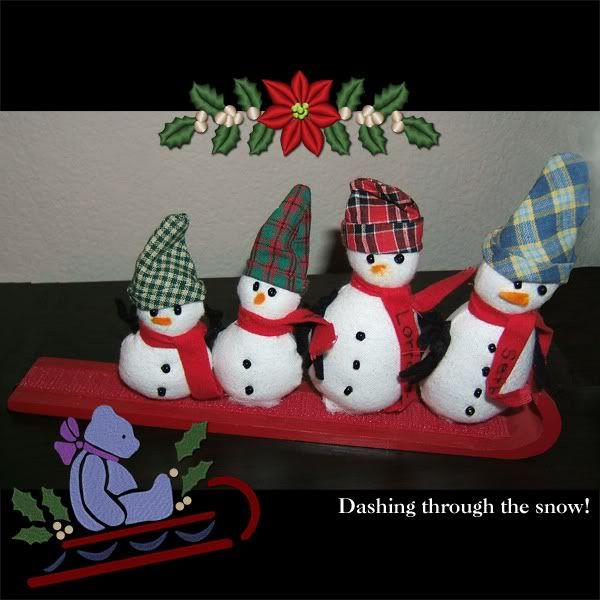
using Embroidered Holiday
Dashing Through the Snow
using Embroidered Snowmen
Snowman

Little Steps to Great Layouts - January 2009

Thank-you for visiting this blog and participating in the challenges. Challenges are a great way to inspire yourself and also to learn more! Each challenge you do for "this month" will earn you one chance in the drawing to win one of my newest kits. In order to be eligible to win, you need to fulfill the requirements listed in the challenge, make sure that you use at least one product by DreamerPaula (this can even be a freebie), and you also need to post a link in the comment section of this blog post with a link to your layout!

This challenge is for January 2009 and is hosted/written by Dawn.


For this challenge, you will need to complete all 5 steps to make a sucessful layout.
1. 1 photograph
2. 2 pieces of ribbon or ricrac
3. 3 staples, buttons, or brads
4. 4 flowers or stars
5. 5 pieces of paper

You need to include all of these items on your layout for it to be eligible. You have exactly 1 month from today to submit your layouts. Make sure you follow the instructions given - use at least one product/freebie from Paula - post to gallery of your choice - share a link to the LO in the response of the challenge post. All eligible layouts will be put into a drawing to win Paula's newest product! Good luck!

Sample layout by Paula - using Cherished Memories: